
Ballet Bun Alternatives for Natural Hair
“The tighter the better, even though it may hurt a bit.”
This was one of the many tips we found while searching for tutorials for a classic ballerina bun, along with suggestions to make sure your hair is “free of tangles,” and “as straight and even as possible.”
As a Black ballerina, it’s quite possible that none of these tips feel the slightest bit relatable or comfortable. The outdated expectations for the “perfect classic ballerina bun” only perpetuate the ostracization of Black ballerinas who often experience a severe lack of inclusion when it comes to training and supplies.
Related: Pointe Black: A Conversation with Marie Astrid Mence on Racism and Bullying in the Dance Community
In fact, constant detangling and straightening of naturally textured hair can disrupt natural curl patterns and leave permanent heat damage. Pulling thick, natural hair into a tight, slick style, like the “classic ballerina bun,” can also add severe tension to a dancer’s hairline, eventually thinning her edges and leading to headaches.
Ultimately, the purpose of a ballerina bun is to accentuate the length of the ballerina’s neck while preventing hair from distracting the dancer, teacher, or audience. All of these things can be achieved without being “tangle-free.”
Black ballerinas need hairstyles that are low maintenance, long-lasting, protective, and work with their natural texture - not against it.
Listed below are some celebrity-inspired ballet bun alternatives that are natural-hair friendly for ballerinas of color.
Braided Low Bun
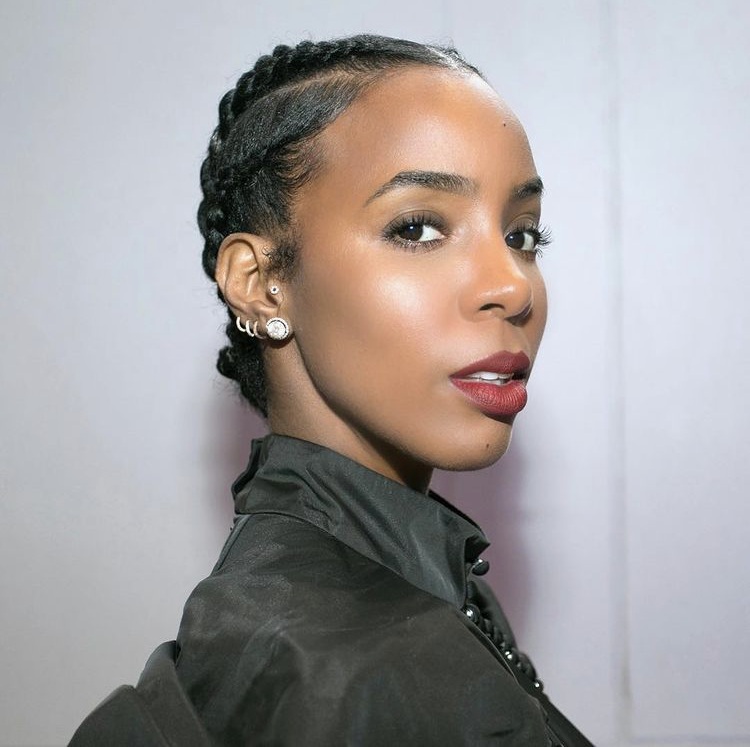
Photo: Kelly Rowland on Instagram
For a sleek, protective style, Kelly Rowland’s braided low bun is a great solution. Cornrows and flat twists are a great way to stretch short or thick natural hair into updos and buns, with minimum frizz and maximum protection. A style like this can last for days, as long as you wrap your hair in a silk scarf before bed!
How to achieve this style:
Part hair into four or five even rows from your hairline to the back of your neck.
Make sure your parts are neat and straight!
Apply moisturizing products, evenly brushing the product through each section.
Brush each section so that it is detangled enough to be braided. Blow-dry or flatiron each section if you prefer.
Carefully braid or twist each section of hair until you’ve reached the ends of each section.
Use a ponytail holder to tie the hanging portion of your braids into a low ponytail at the nape of your neck.
Wrap the braids around themselves, using hairpins to secure the braids into a bun.
Optional: Use a holding gel and small brush to lay down your edges.
High Bun with Bangs

Photo: Tracee Ellis Ross on Instagram
Release some tension on your hairline by leaving some hair out in the front instead of pulling it all back into a bun. Tracee Ellis Ross’s high bun with bangs has a classy and vintage look. Depending on your unique hair texture, you can tailor this style to what suits your style.
How to achieve this style:
Make a part near the front-middle section of your hairline, separating the hair you’ll want to leave out for a bang. Put that small section of hair into a temporary ponytail.
Adding your preferred hair products, brush the rest of your hair up into a ponytail at the crown of your head.
Wrap the hair around itself and secure it into a bun using hairpins. For added protection, braid or twist the hair before creating the bun.
Returning your attention to the hair you sectioned off for your bang, use one of the following options to complete the look:
For a curly bang, leave the hair loose after adding the necessary styling products to it.
If you have time, add perm rods to the loose hair and sit under a dryer or allow them to air dry. Once you take the Flexi rods out, separate the curls to create a curly bang.
Whether you choose to curl your hair or not, you can gather it into a neat section, which you can roll underneath itself before pinning it in place. This technique will give you the pompadour effect pictured above.
Protect your hairstyle each evening with a silk hair scarf or bonnet.
Touch up this style in the morning by brushing the sides of your hair and re-doing the bangs section as needed.
Bantu Knots
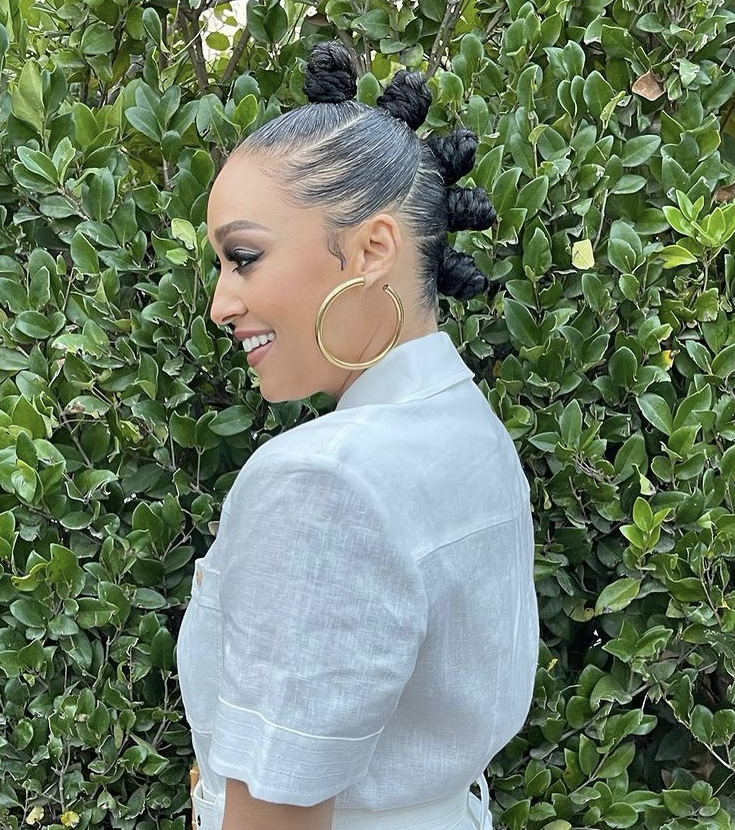
Photo: Tia Mowry on Instagram
Bantu knots are a great, long-lasting hairstyle that offers tons of versatility depending on your personal style. For example, Tia Mowry’s Bantu-knotted mohawk gives an edgy spin to ballerina buns without being too distracting. Bantu knots are great for distributing tension in your hair, and you can add extensions to each section for ultimate customization.
How to achieve this style:
Blow-dry or flatiron your hair if you prefer.
Section hair into 3-5 horizontal sections from the front to the back of your head.
Focusing on one section at a time, add your desired hair products and brush the section into a ponytail.
Brush the ponytailed section out once again, ensuring that it’s as smooth as possible.
Starting from the base of the ponytail, wrap the hair around your finger, continuously twisting the hair until it begins to wrap around itself.
If you find this difficult to do, braid the hair instead.
Carefully create a bun with the twisted or braided hair, pinning it in place before moving to the next section.
Once you’ve finished, use a holding gel to slick down your edges.
When it’s time for bed, protect this style with a bonnet. If it is uncomfortable for you to sleep, try taking the knots out (not the ponytails), and repeat steps 5 and 6 in the morning.
Sleek High Puff

Photo: Keke Palmer on Instagram
Sometimes you just need a quick and easy hairstyle to help you look put together. With a sleek high puff like Keke Palmer’s, you can achieve a natural ballerina bun while letting your unique texture shine through.
How to achieve this style:
Using your preferred styling products, brush your hair into a ponytail about an inch more forward than the crown of your head.
To minimize the tension on your hairline, consider using a shoestring, tights, or large plastic hair clips to secure your ponytail.
Pick one of the following options for styling your puff:
Leave your hair as-is.
Add volume to your puff by gently working a large-toothed comb, a pick, or your fingers from the base of the ponytail to the ends of the hair in swift, dispersed movements.
Add styling product and perm rods to the hair and allow your hair to dry, or sit under a blow-dryer. Remove the perm rods and separate each curl until you’ve reached your desired style.
Use a holding gel to slick down your edges.
Use a silk hair scarf or bonnet to protect this style overnight. You may need to touch up the puff in the morning.
Box Braids

Photo: Marsai Martin, shot by Ramona Rosales
We can’t talk about protective styles without mentioning one of the most popular solutions: box braids. Box braids, and styles similar to them, offer tons of hairstyle options and can last for several weeks if maintained properly. Turn your box braids into a ballet-friendly style by creating a high bun like Marsai Martin’s.
How to achieve this style:
Start with a protective style such as box braids, faux locs, crochet braids, etc.
Tilt your head forward so that the braids hang down over your head, then gently pull the braids into a ponytail at the crown of your head.
Wrap the hair around itself until it forms a bun, then secure the ben with another ponytail holder and hairpins.
If it’s difficult to handle all of the hair, create one large braid or twist with the ponytail before wrapping it into a bun.
To avoid added tension on your hair, consider undoing this style each night before bed.
It’s time for the ballet industry to start encouraging and accepting stylistic options that prioritize diversity and inclusion above uniformity and classic standards - because being yourself should never feel painful.
What alternative ballet bun styles have you tried? Tag us in your photos on Instagram!